Purpose of Game Engines
2D/3D/Mobile/Modtools
Game engines provide a suite of development tools which are used to aid the developer by having re-usable software for example something like Construct for 2D games and Unity for mobile games and other 3D games. Construct is a good engine for 2D games as it has an easy drag and drop system where you can just drag your 2D sprites on to the level and edit them to do things with the event sheet system which is sort of like programming language, for example if a certain "event" happens like if you were to reach this certain location then another event would follow up like a cinematic or a door opening in front of you. This is good for 2D games as it has a 2D physic engine built in called Box2D. Box2D is a free open source physics engine which is written in C++ it has been used in many well known 2D games like Limbo and Angry Birds. Mobile games use the Cocos2D or Moscrif game engine these both are open source software frameworks which can be used to build games and other cross platform based programs. These programs provide common GUI elements for your game like text boxes, labels, menus and other common things you would find in a 2D game which is useful as you can just edit the coding to change the look of the text boxes and the other elements which are provided. The Box2D has a rigid body simulation feature which helps developers with simulated bodies so it saves time on physics it also applies gravity and friction.Integrated Development Environment
 Game engines would usually have developments tools already provided in an Integrated development environment, which a software application that provides facilities to computer programmers for the development of software such as the creation of custom software or embedded software which is used for controlling the product which requires the development process to be integrated with the product, for example you can have the software to be developed so that a mesh of a character would move a certain way when it has a skeleton inside which the engine has provided with the software embedded into it. An IDE would normally have a source code editor, build automation tools and a debugger. A source code editor is a text editing program designed specifically for editing source codes in computer programs. They have features specifically designed to simplify and speed up input of source codes they also provide convenient ways to run a compiler, interpreter and debugger. Source codes are computer instructions written using human readable computer language usually as text. The source code is often transformed by a compiler program to store for a later time of use, it could also be used by an interpreter to analyze and perform the outcome of the source code on the spot directly. The purpose of source codes primarily is to be used as input of a process that creates a executable program. A compiler is a program that transforms source code written in a programming language like C++ or Java into another computer language. The purpose of this program is mainly to create an executable program. Compilers are primarily used for programs that translate source code from a higher level programming language to a lower level programming language. A interpreter on the other hand is a program that directly executes instructions written in a programming language without compiling them into machine language. Build automation is the act of scripting variety of tasks that developers do in their activities, things like: putting source code into binary codes and then packaging the binary codes and creating documentation and/or release notes. Build automation tools helped offer an alternative then to attempt to compile source codes manually it also helps to manage the source codes as well. Debugging tools are also provided in the IDE which is used to test and debug other programs. Debugging is used when there is an programming bug which is causing a crash in the system where it will locate the bug and you can then fix the bug. It is also useful as a software cracking tool to evade copy protection and digital rights management. It also serves as a general verification tool.
Middleware
 Middleware is software that connects two otherwise separate programs or group of programs, and provides services beyond those available from the engine/OS itself. Middleware makes it easier for software developers to perform input and out communications so they can focus on the specifics of their application for example if you were to play a game on the computer and you pressed a key on your keyboard the key would be the input which will go in to the system of the middleware where it would recognize the command where it will begin to process that command into the CPU which will have to do some complicated maths to determine what the input will do in that certain situation then will begin to execute that command. Graphics wise the CPU will have to consider the lighting and also the colors in your field of vision and chip off the parts of the game you cannot see and determine what the look of what your current location is. Middleware is sometimes described as glue between two applications. Game engines provide middleware such as graphics, sound, physics and AI functions they provide flexible and reusable software which can provide all the core functions when needed this also reduces costs of actually having to create physics from scratch and other elements needed in a game and in the video game industry all these are important factors. Examples of middleware would be RenderWare and GameByro as they provide applications which can ease the work of developers like graphics rendering and has its own scripting language called RWX and because of this it was widely cross-platform meaning it ran on different operating systems like Windows and Apple Mac OS X. Gamebryo is a suite of C++ libraries which can be combined and extended to modify the engine for a particular game. Using this in context for video games, middleware for games are the game engines itself like Havoc which is used in games. With licensees given to access most of the C+/C++ source codes you can freely customize the engines features to your liking. If you are using another physics engine but it did not have a certain feature for example cloth physics then you could use other middleware to put it in to the physics engine to help you with it like Havoc Cloth.
Platform Abstraction
Platform abstraction is making an abstraction layer for an operating system which provides an API to an operating system making it easier to develop code for multiple software or hardware platforms. 3D engines and rendering systems in games engines are built upon a graphics API which provides a software abstraction of the GPU or video card.Open AL are also used in games as they provide hardware independent access to other computer hardware such as input devices like a mouse or keyboard. Because of this, there is little change to the source code and you can still play games on multiple platforms like from PS3 to PC.
Rendering/Collision/AI
A game engines purpose needs to be able to render graphics, this is the process of making an image on a computer software program. Collision detection is when you program something to detect and block the intersection of two or more other objects. This is mainly used in video games to limit movement. AI is short for Artificial intelligence which is a program which makes none playable characters seem to have a mind of their own. A program would give the none playable characters instructions to follow a set path depending on what the player is doing for example if the player was to be around the AI the program would tell the AI to either run away from the player or start to attack the player.
Functions of Components of Game Engines
Rendering - Shaders
 Rendering is the process of creating an image from a model with computer programs. The results of the model can also be called a render as well. A model would contain strict data structure, it would have geometry, viewpoint, texture, lighting and shading. All this data would be passed to a rendering program which would then be processed and outputted to a digital image or a raster graphic images. To generate 3D renders it would have to go through a transformation process where it would have to light the 3D image per vertex creating continuous shading throughout the model lighting the corners of each vertex also depending on the position of the camera the lighting will transform and change accordingly. It will then view the image in a 2D plane where the shader will then clip the image out of view of the camera. It will then redraw the image like textures back on including the shading then the last stage would be to show the image. This is called a pipeline for 3D images where it follows these few steps to show a image. FPS can also be related to this as well as this process would be done 60 times per second for 60 fps meaning the more times this is done per second the smoother the outcome.
Animation
One of the functions of blender which is a game engine is that it helps with animation. For animation you can start off by making a mesh which is required. You would then have to create the skeleton or armatures that will be used to deform the character. A single armature can contain many bones which makes animation a lot easier. You can create a hierarchy for the bones which make them connect to each other and which bones would move first with what joints to create realistic movement. You would also have a timeline so the mesh would have moved to a certain spot by a certain time in the timeline for example a simple walking cycle could last for 5 seconds on the timeline but in game they 5 seconds would be repeated over and over to create a continuous moving cycle.


Systems - Particles, Physics, Sound
Sound effects in games like gun shots and voice can help the player be more immersed into their game which is what game developers want. Voices can be used to help through the story line with none playable characters and music to help set the mood of a location. This can make games more dramatic! Physics engines like havok are also there to give a game the laws of physics such as gravity which can be modified to try create what you are going for like for example if you were in space you would set the gravity to be less however if you were on earth you would set the gravity to be higher then space or if you were to wear certain things it would make you slower and the engine would have to calculate the weight then try to match the speed of how fast you would move.
 To create these 3D products you would need software to make it. There are free 3D development software for example the student version of Autodesk maya or Blender. Both of these work differently however you will still achieve the same final product so it is just up to personal preference. 3D development software help you 3D model they allowed users to alter 3D models and can be rotated, zoomed and viewed a several angles to help with the creation process of the model. 3D models can also be exported so then it can be imported to other programs 3D development software as long as that software is compatible with the exported file.
For a standard 2D plane you would only have the axis X (Width) and Y (Height) these axis' are called cartesian coordinates and they help to navigate and locate a certain point in a plane these are quite useful in 3D modelling as you can identify each vertex to a certain axis so when lines are create between vertices you can create different shapes. In a 3D plane however you would need a new axis, this axis is called the Z (Depth)
Some polygons are already pre-made with most 3D programs like Maya these are called Primitives and you can use these to create simple shapes which already have meshes and you can model them after creation. In a Mesh you would have polygons which are connected to each other by shared vertices these are called elements and each of the polygons making an element create a face. A face in the mesh is a surface which is there to determine light sources in ray tracing. All of this is referred to as a mesh or a wire frame model.
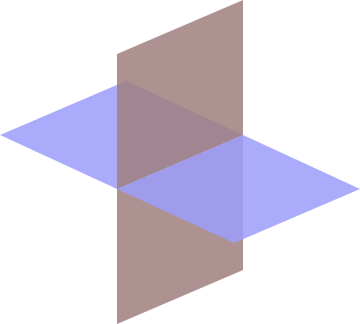
 This is an example of a simple method of mesh construction which I found on Google. You would first create a primitive and then extrude a face to create a more interesting object. Here the primitive is a cube, which gets extruded to make a more complex mesh. This is all made by simple extrusion methods which is also a method of modelling called Extrusion modelling.
Extrusion modeling is a quick and simple way to help 3D modelers create 3D objects. Most of the time you would first have a 2D shape where you would extrude the faces to follow a outline. You would then get a different angle of the same shape and extrude it at that angle following the outlines to create a 3D model. This method is commonly used for modeling heads. 3D modelers would only do one half of the head as you can just duplicate the vertices and invert them so the head would have two halves which are symmetrical. Extrusion modelling is good for creating quick simple shapes which you can then modify even more to your liking.
 There is some constraints to 3D modeling for example: Polygon Count, when you are 3D modeling the polygons would be the individual shapes that create a model. The model can either be complex or simple no matter what the polygon count will increase when you are modeling. This is called the Polygon Count, however the polygon count is something you actually want to keep an eye on as it count cause some problems if left unchecked because the computer processor would need to calculate the position of each vertex and polygon that makes up the model meaning the higher the polygon count, the more powerful your computer processor would have to be to calculate the the vertexes and polygons in the model. It is really important to keep an eye on the polygon count in assets for games because if a asset has a high polygon count it would be disrupting the game as those unnecessary polygons could cause a processor to be over worked and could a problem in the game like low FPS.
Theory and Applications of 3D
Applications of 3D products
You would usually see 3D products in video games however some games could be completely 2D. In movies the VFX (Visual effects) are 3D models for example in The Hobbit with Smaug he is modeled first before he is put in by green screen where the actors have to pretend Smaug is there. Some product designs use 3D models for advertisements and to show colleagues what it would look like not on paper but in 3D. It can also be used in architecture to give viewers a look of what the building would look like in the area and give a size comparison.3D development software
To create these 3D products you would need software to make it. There are free 3D development software for example the student version of Autodesk maya or Blender. Both of these work differently however you will still achieve the same final product so it is just up to personal preference. 3D development software help you 3D model they allowed users to alter 3D models and can be rotated, zoomed and viewed a several angles to help with the creation process of the model. 3D models can also be exported so then it can be imported to other programs 3D development software as long as that software is compatible with the exported file.Geometric Theory
3D
models are made up of: Points, lines, coordinates, primitives and
meshes. If you have done 3D modelling before you should of came across
the term vertexes before, these mean points in the model which you can
connect a single line with to another vertex to create a edge in a mesh.
If you were to connect 3 vertices together you would get a triangular polygon and if you connect 4 vertices you would get a square polygon which
are the more common ones. Planes are flat surfaces but they can also be a solid
plane which is 3D. You may intersect 2 planes together to create a 3D
space.
For a standard 2D plane you would only have the axis X (Width) and Y (Height) these axis' are called cartesian coordinates and they help to navigate and locate a certain point in a plane these are quite useful in 3D modelling as you can identify each vertex to a certain axis so when lines are create between vertices you can create different shapes. In a 3D plane however you would need a new axis, this axis is called the Z (Depth)
Some polygons are already pre-made with most 3D programs like Maya these are called Primitives and you can use these to create simple shapes which already have meshes and you can model them after creation. In a Mesh you would have polygons which are connected to each other by shared vertices these are called elements and each of the polygons making an element create a face. A face in the mesh is a surface which is there to determine light sources in ray tracing. All of this is referred to as a mesh or a wire frame model.
Mesh Construction
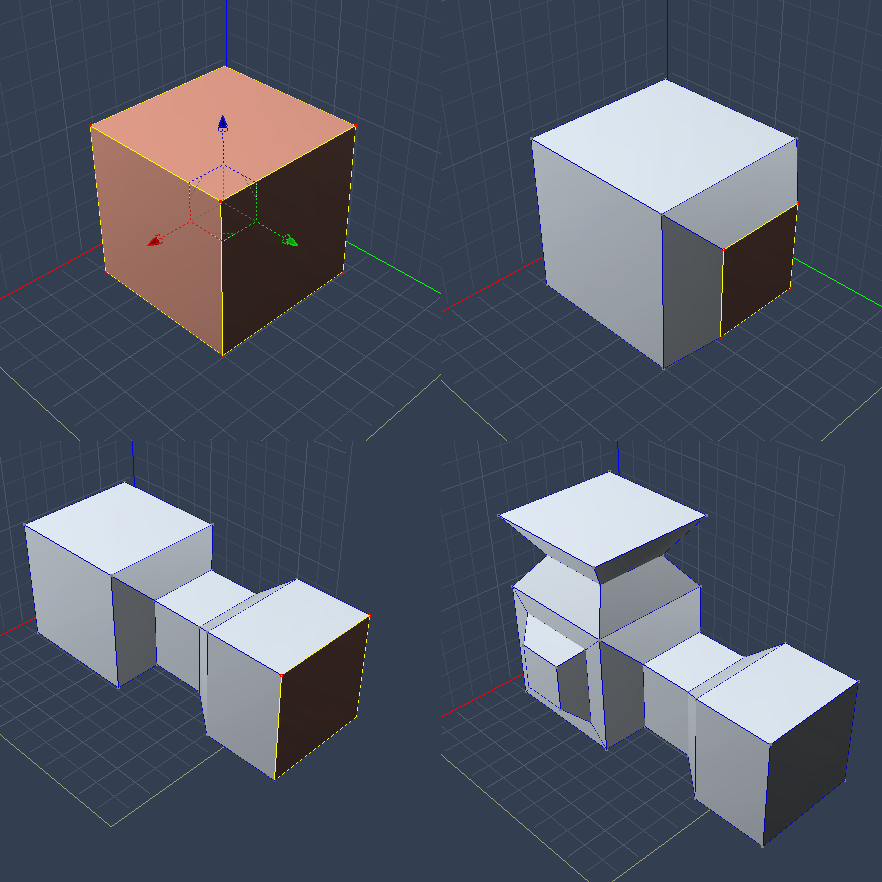
There are many ways to construct meshes one example is box modeling where you would first a primitive and modify the faces by extruding and scaling so they it will change into something else.This is an example of a simple method of mesh construction which I found on Google. You would first create a primitive and then extrude a face to create a more interesting object. Here the primitive is a cube, which gets extruded to make a more complex mesh. This is all made by simple extrusion methods which is also a method of modelling called Extrusion modelling.Extrusion Modelling
Extrusion modeling is a quick and simple way to help 3D modelers create 3D objects. Most of the time you would first have a 2D shape where you would extrude the faces to follow a outline. You would then get a different angle of the same shape and extrude it at that angle following the outlines to create a 3D model. This method is commonly used for modeling heads. 3D modelers would only do one half of the head as you can just duplicate the vertices and invert them so the head would have two halves which are symmetrical. Extrusion modelling is good for creating quick simple shapes which you can then modify even more to your liking.
Spline Modelling
Spline modelling is a special function that involves polygons in a mathematical way. Spline is a more common term for computer science. it is adapted from the shipbuilding term that is the tool used by draftsmen to easily draw accurate shapes. Splines are the shapes that you could create on 3D software. Constructing splines are simple, which is why it is a popular choice of modeling which it comes to creating digital models and their curve design helps for easy manipulation. It can be used in one dimensional or multidimensional applications. One way you would use spline modelling is Lofting. A Loft is sort of a wire frame for a 3D object and is used as a technique in 3D modelling software. It is developt from flat sections by doubling it along the path that it is given. Lofting is a way of modelling an object based on splines. Normally you would start modelling an object by modifying the primitives. However when you loft a spline you're creating a 3D object that won't become editable. So in theory this means this is a more efficient way to create collision models.Lathing
Lathing a 3D model means to have it's vertex geometry produced by rotating points of a spline around a fixed axis. Lathing can be partial and doesn't have to be a full 360 degrees turn. This can be used to create symmetrical objects as well.Constraints
There is some constraints to 3D modeling for example: Polygon Count, when you are 3D modeling the polygons would be the individual shapes that create a model. The model can either be complex or simple no matter what the polygon count will increase when you are modeling. This is called the Polygon Count, however the polygon count is something you actually want to keep an eye on as it count cause some problems if left unchecked because the computer processor would need to calculate the position of each vertex and polygon that makes up the model meaning the higher the polygon count, the more powerful your computer processor would have to be to calculate the the vertexes and polygons in the model. It is really important to keep an eye on the polygon count in assets for games because if a asset has a high polygon count it would be disrupting the game as those unnecessary polygons could cause a processor to be over worked and could a problem in the game like low FPS.
The file size is also quite important as well as any computer user should know. This is to maintain processing speed and disk space file sizes measure the size of a file and is measured as the following; KB (Kilobytes), MB (Megabytes), GB (Gigabytes) and TB (Terabytes) It is important to take note of your disk space as it can affect processing speed. The larger to file the more space it takes meaning that processing and rendering will take more time. Render times vary depending on the size of the model file and polygon count and renders can take from a few seconds to hours meaning that smaller scale animations/models do not really require much time to render this depends on the computer processor as well. However the bigger projects like Pixar animations would require a huge amount of time to render. Rendering is not just the production of 3D models and animations but also the viewing of them. Some 3D software like maya allow this feature so modelers can look at their product through the software to see a full render. This type of rendering is called real time.
Pipelines
To generate an image on the screen it will have to go through several steps before the image can be shown, I will now explain the pipeline of this process. This is the current state of the art method for rasterisation based rendering. Rasterisation is when you take an image made from vectors and then transforming it into pixels. First you will have a 3D vector image which exists on a single plane, then you would have to transform the image to fit into where it is in the single plane into the 3D world coordinates you wish to put the image into, it would then generate a image from the 3D world using the camera point as the origin for example if it was a first person shooter then the origin would be your screen after that as I have explained in the Shaders section of my report the image would then illuminate according to the lighting and reflection of the 3D world and the 3D image. After it has take the lighting into account it would then have to transform the projection of the image for example in a first person shooter if there is a building in the distance it would have to make the image smaller by dividing the coordinates of each vertex by its z coordinate which is the representation of distance from the camera it will then start to clip parts of the primitives you can not see that are outside of the camera view. It will then begin to rasterize the image meaning to convert the vectors into pixel based images after this stage the process can become quite complex because of the multiple steps referred to as the pixel pipeline then everything will start to be textured and shaded either from memory or a program.


